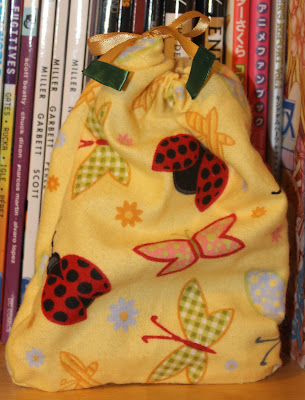
No-sew Ipod charger bag
Ah, remember how i said that i was cleaning/ reorganizing my room?
well.. i brought in my desktop computer into my room as well =D
so i have two computers in my small room LOL
i'm still not 100% done with organizing my room
although i think i did finish cleaning =)
anyway i'll post the before/ after when i'm 100% satisfied *^-^*
continuing from yesterday's post,
::today i have a tutorial for making a ipod charger bag::
and the good news is that no need to use a sewing machine
so fear not about making them ; )
alrighty here we go~
making of this -->
1. Gathering materials: (sorry i don't have the pictures of the materials together)
- Fabric (I used flannel fabric but any fabric should be fine?)
- Scissors
- Hot glue
- Extra glue sticks (just in case)
- Ribbons
- Lighter (yes lighter or anything like a lighter)
 2. Measurement:
- measure the fabric into size
 - when you measure or estimate like i do, make sure that you add extra length to the edges
 3. all the red lines will be cut except for the second red horizontal line
then fold the top to the second red line like so
and using the hot glue, glue the along the red dotted line
when you glue it, put the glue on the "wrong side"
-- "wrong side" the side without the picture/ or the back side of the fabric--


well.. i brought in my desktop computer into my room as well =D
so i have two computers in my small room LOL
i'm still not 100% done with organizing my room
although i think i did finish cleaning =)
anyway i'll post the before/ after when i'm 100% satisfied *^-^*
continuing from yesterday's post,
::today i have a tutorial for making a ipod charger bag::
and the good news is that no need to use a sewing machine
so fear not about making them ; )
alrighty here we go~
making of this -->

1. Gathering materials: (sorry i don't have the pictures of the materials together)
- Fabric (I used flannel fabric but any fabric should be fine?)
- Scissors
- Hot glue
- Extra glue sticks (just in case)
- Ribbons
- Lighter (yes lighter or anything like a lighter)
---

- measure the fabric into size

---

then fold the top to the second red line like so
and using the hot glue, glue the along the red dotted line
when you glue it, put the glue on the "wrong side"
-- "wrong side" the side without the picture/ or the back side of the fabric--

---

4. Use the hot glue to glue the red dotted line
- when you glue it, make sure you glue the "correct side" with a thin layer of glue
but only glue it up to the green line
--"correct side" the side with the picture--
---

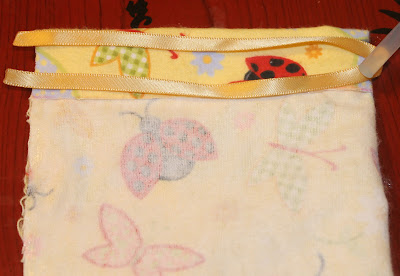
5. Cut a ribbon to your own liking and make sure the length goes around the entire bag
(when i cut mine, it was short so when you cut yours make sure its a bit longer than what you see in the picture)
---

6. Use the lighter to "burn" the edges of the ribbons (so it doesn't fray)
- then string the ribbon through the hole that was made in step 3
---

7. Since mine was a little short, i used another ribbon to make it a bit longer
---

8. and it's done
(the black thing is a usb adapter to the wall which is used for my cellphone charger)
sorry.. this tutorial seems to be missing pictures of some steps >.<
but if you have any questions leave me a comment~
✎ From the ☾ moon that shines bright as a shooting star ☆


Comments
Post a Comment