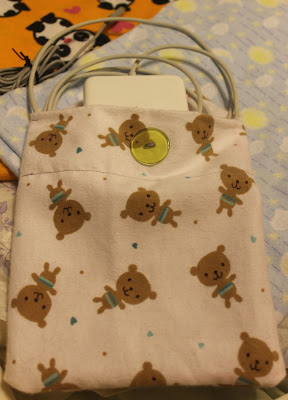
Sew: Mac charger & DS 3D bag/ cover
just like yesterday's post, today is another tutorial for making a bag for the chargers
when i was making these, i was so into making it that i forgot to take pictures of steps
Since i was unable to take all the steps into making of, in this post i have posted two types of bag/ cover
:::Mac Charger:::
6. Flip onto the other side and fold the edges into a triangle like so and sew the red lines
2. Measure the fabric:
- when measuring the fabric add the measurement for the top
(see the size difference between the left and the right of the DS, right side has extra fabric)
3. FIRST: fold the top, and sew along the red line
then fold the fabric in half with the wrong side up and sew along the green lines
when i was making these, i was so into making it that i forgot to take pictures of steps
Since i was unable to take all the steps into making of, in this post i have posted two types of bag/ cover
:::Mac Charger:::
---
1. Gathering Materials:
- fabric (I used flannel)
- chalk (anything to mark the fabric)
- ruler
- sewing machine
- accents: button
---
2. Like the other no-sew,
i estimated the measurement by placing my charger onto the fabric
(**Remember to add extra measurement**)
and cut to size
---
3. Using a ruler, make a line where you will be sewing but dont sew yet
---
4. Place the Mac charger to measure where the top fabric will be sewn
---
5. Now go to the sewing machine and sew
starting with the blue line but only the top layer and sew
then sew the red lines
---
---
7. Fold the top and sew the blue line
---
8. Sew on the button and hake a hole for the button to go through
- when you're done it should look something like a envelope
and then you are done~
----------------------------------------------------------------------------------------------------
:::DS 3D Cover:::
1. Gathering Materials:
- fabric (i used flannel)
- chalk
- ribbon
- ruler
- sewing machine
- miniature sweets (2 gingerbread man)
- hot glue
- when measuring the fabric add the measurement for the top
(see the size difference between the left and the right of the DS, right side has extra fabric)
---
then fold the fabric in half with the wrong side up and sew along the green lines
---
4. Using the same technique from the No-Sew Ipod Charger,
bob the ribbon through and hot glue the gingerbread man
thus far...this is all i have for the bag/ cover
maybe i'll post different thing later today..
until then,
✎ From the ☾ moon that shines bright as a shooting star ☆


Comments
Post a Comment